Wire wrapping a briolette can be done in a variety of ways. You can use it as a large focal pendant or combine it with your other tip-drilled beads and pendants to create a more cohesive look. Here are a couple of pointers to get you started: Stick to the instructions in the video to complete your project in no time. But, before you begin, make sure that you understand how to wire wrap a briolette correctly.
First, you’ll need to determine the type of briolette you’ll be working with. Briolette can be made in either a flat or a round shape, and they are simple to package. You’ll need to use pliers with a round nose to complete this task. Then, using the side cutter cut a length of wire approximately 15-20cm in length. You’ll need a little extra cash to assist you with the bending procedure. Slide the faceted “briolette” onto the wire about 3 to 4 cm down from the top of the earrings neckline.
It is necessary to determine the length of the wire used to wrap the briolette in the following step. Using wire wrap on a larger briolette is less complicated than using wire wrap on a smaller one. Choose a flat briolette on the bottom and has a flat top for beginners. Then, cut the wire at an appropriate angle, aiming the bend halfway up the pliers’ nose to create the bend. You can now wrap the ‘briolette’ around your neck or wrist to make a lovely necklace or bracelet.
How to Wire Wrap a Briolette Gemstone?
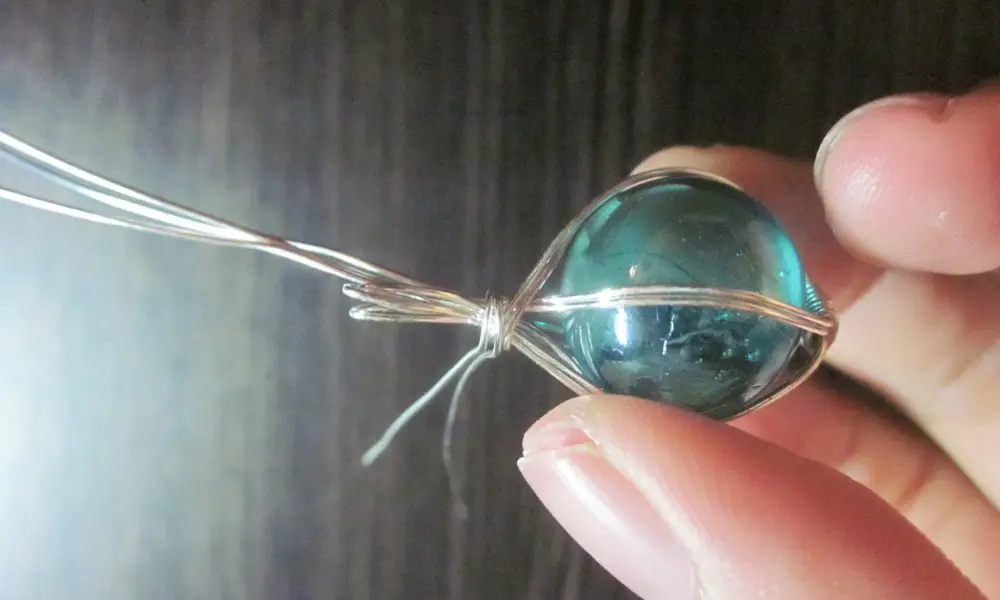
Starting with a wire length of at least twenty centimeters in length, you should begin wire wrapping a briolette from the beginning. It will help if you cut it slightly longer than the briolette total size to make it easier to manipulate. It would help if you bent the wire to form a triangle and secure it with the pliers’ tip after being cut. Once the wire is securely fastened, you can begin wrapping the strand around the wire.
After you’ve decided on a wire gauge, it’s time to start wrapping the briolette around it. Earrings can be wired with either plain or colored wire, depending on your preference. The difference in diameter is what distinguishes a briolette from other rings. A briolette is typically pear-shaped with a hole in the center at the top. As you wrap the wire around the briolette, make sure it is flat. You can also wrap the briolette with the short wire if you prefer.
Wire Wrap
If you’re just getting started with jewelry-making, wire wrapping is a fun and relatively simple technique to learn. Furthermore, because no two pieces are ever the same, it is an excellent way to express your individuality and creativity. Here’s everything you need to know about making your wire-wrapped jeweler and some beautiful examples and wire-wrapped jeweler tutorials to get you going.
Topaz that has been wire wrapped. It is possible to create wire-wrapped jewelry by wrapping a flexible wire around a gemstone (or even around it) in various patterns and twists. When a stone is used, the wire creates a casing around it to prevent it from falling out, eliminating the need to glue or drill holes in the stone. Can use this method to create various types of a jeweler, though pendants are the most common.
History of Wire Wrap
According to historical records, a wire-wrapped jeweler has been around since 1446 BC. According to the researchers, researchers have discovered bits of wire jeweler in the graves and pyramids of ancient pharaohs in Egypt. Early wire jeweler was manufactured by pounding metal flat into sheets, then cutting into strips and wrapped into tubes. This was the method utilized to create the first wire jeweler. Given the ease with which gold could be hammered into thin sheets, gold was most likely the first metal utilized to manufacture wire for a wire-wrapped jeweler.
3 Easy Steps for Making Wire Wrapped Jewelry
We’ll show you how to build a wire-wrapped pendant with a substantial central stone, but. May use similar techniques to make various forms of a jeweler, such as earrings or pendants with many stones.
Step 1: Gather Supplies for the Pendant’s Base.
Remove the wire. Begin by constructing the pendant’s foundation. Using 18-22 gauge wire, cut four lengths of round wire to nearly the same length, then cut a two-foot length of half-round wire. Don’t stress about exact dimensions; it’s usually preferable to cut off more than you need than to chop off too little.
Wrap the wires around each other. Gather the four shorter wires in the center and wrap the two-foot-long wire around them. Flatten the wrapped wire against the bundled wire with the pliers. Continue wrapping until you have about an inch of wire wrapped around it (or about the size of your stone).winding the wire around a stone, the stone will be placed on top of the wire that has been wrapped.
This stage aims to make a flat coiled wire segment for the stone to sit on. The protruding wires from that cluster will be bent and twisted in your specified designs around the stone.
Step 2: Wrap And Twist The Protruding Wires
The purpose of step one was to make a base with many projecting wires. The next step is to wrap these wires so that they may be twisted and curved around your gemstone when it’s time to set it on the base.
Wrap one of the thicker pieces of wire in a thinner piece of wire. Wire wrapping twists two of the base wire sections together.
You have a lot of leeways here in terms of how you wrap the wires. Truax recommends wrapping single and double wires with thinner wire (such as gauge 32) and twisting base wires together. There are no hard and fast rules, so do whatever looks best. Wire wrapped jeweler designs are highly adaptable.
Step 3: Wrap the Stone in Wire
To keep the stone in place, wrap, twist, and bend the wires around it. It would help if you now had a collection of wires of various textures and thicknesses.
Make the bail with one of the wire strands before wrapping the stone (a loop above the stone that you will thread a chain or leather lace through).
Place the stone in the center of the base (the part you formed in step 1). This portion of the process, according to Truax, is “essentially a free-for-all!” The only purpose is to keep the stone in its case beautifully. Wrap, twist, and loop the wires around the stone however you’d like.
Malachite stone wrapped with wire. To make a lovely final piece, follow the wire-wrapped jeweler instructions.
Remember that these wire-wrapped jewelry instructions are used as suggestions rather than rules. The best aspect of this art form is that your imagination is the only restriction to your wire-wrapped jeweler ideas. We’re excited to see what you come up with!
Briolette Gemstone
Briolette is a type of gemstone cut that is both beautiful and elegant. In its simplest form, the term Briolette refers to pear-shaped or oval stones that have been cut into extended triangular facets that cover the entire surface of the stone. Celebrities have helped to popularise the Briolette by sporting large drop earrings made of Emeralds, Rubies, and Sapphires, all of which were cut in this style.
In jewelers, the Briolette cut is associated with the rose cut group, which is similar to a bead shape. The majority of briolette is triangular and hexagonal facets—a surface with lots of sparkle and lots of color from the stone results from this process. The briolette cut is one of the most beautiful ways to cut a gemstone, and it provides the wearer with a complete view of the gem. It allows the gem to radiate color and vibrancy wherever it is carried because it allows the light to capture the different sides of the gem. The briolette shape can be round, extended, or flattened, depending on the design.
History of Briolette
Historically, the briolette cut was only worn by royalty and those of noble birth or standing and presented empress Marie Louise with a diamond necklace containing ten briolette-shaped gems, which was given to her by Napoleon himself. On the other hand, the briolette experienced a decline in popularity during the 17th century due to the introduction of new technology. .resurrected it in the art-deco spheres, but it remained a little-known aspect of gem cutting until the twentieth century. A large part of the reason it isn’t as popular as other cuts are that it tends to be a little more expensive, which is understandable given how the gem reflects light from all different angles around the gem’s perimeter. There is no monetary value to that. Can place on this spectacular light show.
Method of Briolette
The pin-cap method is the most dependable approach to cutting a gem in the briolette shape. There are three ways to cut a gem in the briolette shape. This procedure helps the gem cutter ensure that. Can drill the hole in extremely precisely so that the gem does not break or brittle during molding. This is how most gem cutters prefer to cut briolette, and it works best for smaller and medium-sized jewels.
After the gem is cut, it undergoes a series of strength tests to confirm that it is suitable for wearing. Most briolette cut gems are offered loose with a hole at the top and bottom to be woven easily through a wire. Designers can use it to construct exquisite necklaces, bracelets, and earrings and weave them into garments, scarves, handbags, and purses.
What Kind Of Wire Is The Most Suitable For Wire Wrapping?
Twenty-four gauge jeweler wires are versatile wire diameters that can be used for various applications. The twenty-four-gauge wire is fine enough to pass through most gemstone beads while also being sturdy enough to construct good wire-wrapped loops. The best gauge wire for wrapping stones is between 18 and 20 gauge, and because the copper wire is very inexpensive, it is frequently utilized for wire wrapping purposes.
Is It Difficult To Wire Wrap Jeweler?
Working with it requires high-quality jeweler equipment, but it is not too difficult to shape once you get the hang of things. To ensure that bracelets and rings do not flex out of shape when made of soft wire, such as copper, it may be necessary to work-harden the wire.
Is Wire Wrapping Still In Use Today?
There is another option, which is wire wrapping. It’s relatively quick, dependable, simple, solder-less, affordable, and straightforward to learn how to use and maintain. Wire wrap has been utilized successfully in the telecommunications/datacom and control industries for several decades. It is particularly well suited for intricate and one-of-a-kind circuits and systems.
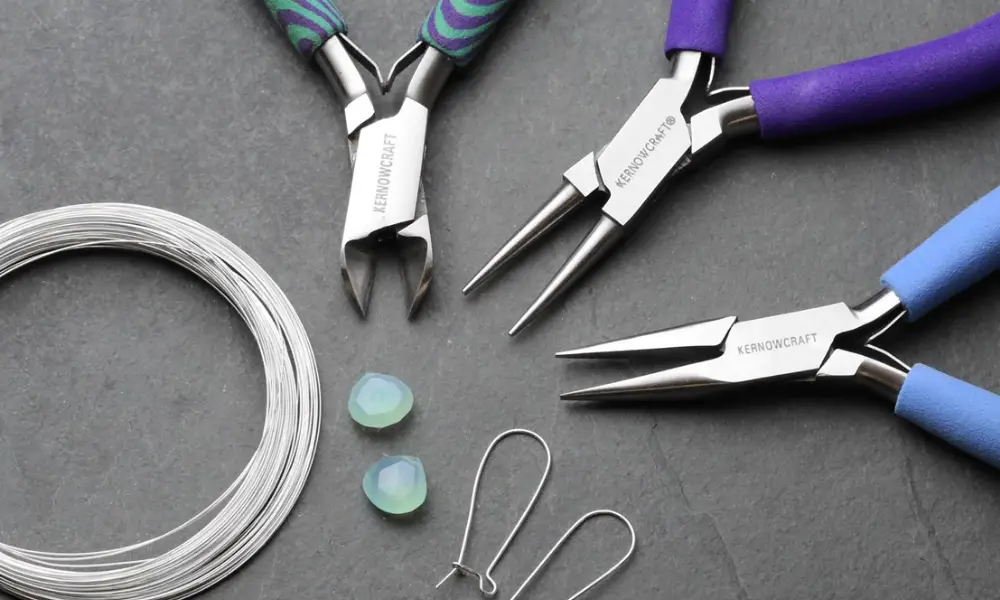
When It Comes To Wire Wrapping, What Kind Of Pliers Do I Need?
The three-wire wrapping instruments stated in the movie as necessary are round nose pliers, chain nose pliers, and flush cutters. It is possible to purchase these tools as a group as a set* or separately. Moreover. Can utilize them for fundamental beading tasks (stringing beads) and fundamental wire wrapping tasks.
How to Use Briolette Gemstone?
To create a Briolette, it is critical to pick a strong gemstone resistant to scratching and cracking. This is because a Briolette will be exposed to the environment most of the time. After all, and will not place it in a jeweler setting. This is an excellent example of a Briolette bracelet in which any other stones completely unprotect every stone.
If the sort of stone used is broken or soft, such as Apatite, it will become scratched and unwearable in a relatively short period. Briolettes are most commonly formed of quartz (such as amethyst and citrine), topaz, ruby, and sapphire, among other gemstones. These are all highly durable gemstones that will retain their luster and brilliance for many years.
Conclusion
It’s preferable to begin by cutting a wire at least three and a half centimeters wide because briolette gemstones are typically flat. Fold the wire in half so that it is vertical and the briolette is resting in the center of the wire. If you’re unsure how to wire wrap a BRICOLET, the instructions below will help you out. A briolette gemstone is a wire wrapped in the same manner as any other bead form, and the procedure is the same for both. The wire should be around two and a half centimeters in length to produce the optimum results, and it is essential to keep this in mind at all times. Make a more sophisticated design to build a more elegant engagement ring. Now that you’ve finished creating it, it’s time to attach your briolette to your wire cap.